1. With a tape calculate; calculate your wall to decide usable wall space.
  2. Create a sketch to map out your project. Decide the number of shelves, clearance between shelves, and lengths of shelves. This procedure is critical and makes every choice easier moving forward. Reviewing design magazine photos can help jumpstart your originality.
  3. Keep in brain visual guides that already exist: countertop and cabinet heights, window frame heights and table heights. Use them to outline the top and bottom of the shelving unit. Do this and your project will visually fit your space and have a more custom look.


  4. Have an idea of what you want to store on your shelving unit. Plates, glasses and often used food items are good ideas, and help you to recognize which shelves need more support.
  5. Look at the equipment already in your kitchen. Be aware of metal and wood tones, wall color and accent colors. This will help decide what kind of shelves you buy.
  6. At your local home or association store, find a knowledgeable clerk to help you. Bring paint samples or dish towels with you to the store and show them this equipment along with your picture. With their help, select your shelves and bracket. Get extra screws and wall anchor as backup. Also purchase additional brackets for weight-bearing shelves.
  7. Select baskets, storage items and attractive elements that fit your plan and organize with the existing equipment in your kitchen. With someone from the store helping you, this process goes much faster.
  8. Back in your kitchen, lay out the shelves on your floor to visually see what you're creating. Keep in mind how far apart you want the shelves to be from each other. This step gets ignored all the time.
  9. With a pencil, level and measure tape, start mapping on the wall where each shelf will go. Many shelves come with adhesive guides that join to the wall. This makes the procedure of leveling, locating screw locations and position much easier.
  10. After you've mapped the shelves, use a stud finder to locate jewelry. Stand back and appraisal and readjust as necessary. Keep in mind how the overall shelving unit looks aligned with your obtainable cabinets, windows and countertops. Double-check all before you drill. Is all level? Is each screw location marked and accurate? Are your shelf clearances workable?


  11. Following the information built-in with the shelves, start drilling and mounting each shelf. Work from the top down. The lowest shelf is the last shelf to be installed. This is the best part of the plan. With all drilling location marked and double-checked, fitting profits quickly.
  12. It's time to start loading the shelves. Almost nothing's more fulfilling than emptying out cabinet space, removing clutter from countertops and create a visually pleasing new element to your kitchen.

There are three key zones to a kitchen which expert kitchen planners aim to link together by create a 'working triangle'.

  1. Food storage & preparation – fridge and worktop
  2. Cooking – oven and hob
  3. Cleaning up – sink and dishwasher

The whole length of the three sides of this triangle should be between 3.6m and 6.6m to make the optimal working space.
This condition means that the locating of desired appliances should be careful before the base units are fitted around them. With this in mind, kitchens are generally laid out in one of five distinct floor plans, as shown below;

Straight Line
In very narrow rooms, it may only be likely to fit a single run of cupboards and appliance. While a working triangle cannot strictly be achieved, the three key zones should group all related pieces of equipment together to optimise the working surfaces.


Galley
An economical layout that is mainly useful in slim rooms which require access and exit at both ends. Be sure to allow at least 1200mm among the front edges of each run of cupboards to allow for drawers and doors to open and ease of passage.

Galley kitchen
L-Shaped
This is an accepted layout that makes for a user-friendly and uncluttered kitchen, while usually leaving space for a dining area too.


U-Shaped
Where no through traffic need be allowed, a U-shaped kitchen create an efficient workspace where all areas are within easy reach, and also often include the bonus of a good expanse of worktop. Remember to ensure that the two parallel runs of cupboards are at least 1200mm not together to allow for drawers and doors to open and ease of passage.
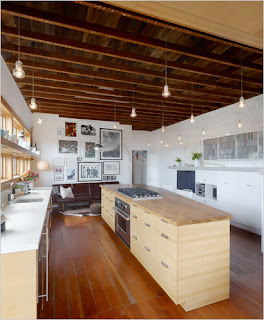

Island
Islands occupy quite a bit of space so often need a fairly large room to allow successful integration. That said, they very neatly reduce the amount of walking that needs to be done in such a big kitchen.


Islands may be 600mm deep, but most often they are 900mm deep, as long as useful additional work or dining room. If services are carried to the island, they can also lodge hobs or sinks. Be sure to leave 1200mm between the face of the island and any other cupboard or appliance to allow for drawers and doors to open, and for ease of passage.

  • Arrangement your kitchen according to your lifestyle. A family will have different expectations from a kitchen than a young couple. Keep this also in mind when planning your storage.
  • Keep the obtainable service points in mind when planning the kitchen as rewiring and re-plumbing takes a lot of time and money.
  • Think about the ventilation points when planning your kitchen. Don't plan cupboards over them.
  • Decide where your sink, drainer and dishwasher need to go first as this will be the main unit to fit in.

  • Plan the main area (sink, food preparation and hob) close together. This will make your kitchen more competent.

  • When measuring the size of the kitchen, make sure that the exact shape of the walls is known. If there is an inwards corner in the room it will influence the shape of the worktop and the put of the wall-cupboards.

  • If you decide for a two-way galley kitchen, leave enough walking space between the two galleys.

  • If choosing a U-shaped kitchen, consider the floor space you will have left and maybe choose to use one of the legs of the U as a breakfast bar.

  • If you like to cook with a lot of fresh vegetables or you need a big freezer, consider a big fridge/freezer at the end of your worktop for loads of storage and easy access.

  • Store heavy items in the cupboards underneath the worktop.

  • Kitchens will always have drawers with all sorts of goods in it, like pens, buttons, matches and sandwich bags. To create more order, use little plastic boxes or special drawer organisers. You will find what you need much quicker.

  • Store rarely used items on the highest shelves of your cupboard to keep easy accessible space free for daily use.

  • Store your utensils near to where you are most likely to use them. This will make your kitchen well-organized.

  • Keep your worktop clutter free for a tidy look.

  • To disguise a boiler you can build a spice rack in front of it. This will not take a lot of space and will be an attractive display for all your spices.

  • Think about where you want your main bin to be situated. Try to integrate it in the area below the worktop to keep outlook of the kitchen clean and clutter-free.
  • Don't forget to give your cookery books a place in your kitchen!

We also queried designer for their best information on shopping for counter tops. They came up with a number of suggestion.

Don't feel locked in to one material; combine dissimilar resources for looks and practicality. Believe placing utilitarian materials such as stainless steel in heavily used areas and putting comfortable but more easily stained materials such as limestone in locations where they'll get less wear.

Consider your flooring when you buy a counter top. Do you want the counter to contrast with or match the floor?

Take into account the long-term protection of your counter top when you choose an exacting material. Some require dedicated upkeep, counting special enzyme poultices for stains or even replaning of scratches and gouges.

Ask how your counter top will look in a few years. Some age like fine wines, acquiring wonderful patinas. Others just look dated and worn.

A mantra for people with stone counter tops: Seal, seal, and seal again anything acidic will burn stone countertops, but those made of granite. Stone - even granite should be sealed at intervals of six months to two or three years, depending on the softness of the stone and the amount of wear.

Think about the visual impact of a counter top. In a cold climate, you may want to stay away from stones such as marble and granite, which tend to appear cold.

Sizes and shapes
The size, shape and material of your select door handles allow a great amount of personalization, and common choice in this area are endless.


Pulls & knobs
Door pulls and knobs may be artificial from a range of equipment, including stainless steel, aluminium, brass, iron, chrome, glass, wood, porcelain, nickel, plastic, marble and even leather.The individual design and style then adds a further layer of choice to the knobs and pulls accessible on the market, and your final collection will come down to person tastes.


Handleless doors
Bear in mind, also, that there are several 'handleless' range of cabinets which not only remove the cost of adding handles but also create a particularly sleek, uninterrupted look.

There are a only some standard edge profiles that most types of worktop are manufactured with, as illustrated below.

The more expensive made-to-measure materials are often available with several more profile options to match or complement your kitchen style.

Fitting a kitchen worktop

Most laminate and hardwood worktops can be installed by any kitchen fitter or a fairly confident DIYer. Specialist worktops, such as Granite and Corian, should only be installed by the supplier and these require specialist knowledge and equipment to fit.

Tools for the Job

  • To fit a kitchen worktop you will need the following tools;
  • Worktop Jig
  • Router (with 30mm guide bush and 12.7mm (½in) carbide collet (cutter))
  • Jigsaw (with downstroke and upstroke wood blade)
  • Biscuit Jointer
  • Size 20 Biscuits (4 per joint)
  • Worktop Bolts (3 per joint)
  • Electric Drill (with 10mm drill bit)
  • 2 Clamps
  • 2 Saw Horses
  • Measuring Tape
  • Pencil
  • Masking Tape
  • Eye Protection
  • Slotted Brackets
  • Silicone Sealant

A small kitchen plan requires originality in coming up with storage solutions. Some ideas to try include:

1. Putting an island in the center of the kitchen that can supply isolated storage that is also suitable from any spot in the kitchen.

2. Using a galley kitchen design in which the cabinets and appliance line up also side of a hall can work out very well for a small kitchen space.


3. Today's use manufacturers have appear with more compact space-saving appliances make small kitchen design easier, such as refrigerators that are 24 inches deep instead of 30 inches deep, as well as appliances that can be hung underneath cabinet like microwaves.

4. New small kitchen design tricks to create an eating area in the kitchen consist of using a drop table or a small sized round table with two small chairs that can be tucked into a bend. Or a built-in counter along the wall with chairs to provide an eating nook.

5. Another attractive challenge in small kitchen design is creating an illusion of space with under cupboard lighting or under the counter. With the proper type of lights the kitchen can be made to appear larger and more pleasing.

6. The use of light colored cabinet with glass doors.


7. Install deeper counters that can provide accommodation more appliances and increase work space.

8. Flooring tiles can be placed on a diagonal, and in galley style kitchen hardwood flooring can be run the duration of the kitchen.

9. Used for storage you can drape up pots and pans. This is a perfect way to free up cabinet space, and they add a certain charm and character to your small kitchen design. The insides of cabinet doors can be used to hang up all from utensils, oven mitts, and other various items. Pantry storage with units that go all the way to the ceiling with the upper cabinets to supply more space for seldom used items while making the lower cabinets more accessible with rollout shelves, lazy Susan’s, and tilt-out bins.

10. Establish a large kitchen sink, since larger sinks are considered to be more sensible than little sinks when it comes to cleaning pots and pans.

Remember for the most part kitchens are small. When you look in kitchen design magazines you obviously notice that the kitchens featured are large and so you might think your small kitchen in inadequate. But good small kitchen design means being able to create space and incorporating ample storage services and being able to fit in all the necessary appliance.

To completely refurbish and refit a kitchen from new is an exclusive and long-winded procedure. There is no doubt, that when the layout of the room is being completely changed or the units are being completely updated, that this is a worthwhile cost, but for some small kitchens fitted with decent units there often is little scope to advance the layout or storage, and your money might be better spent.

A low-priced kitchen refurbishment can be done, however, as several basics of your current kitchen can be changed and updated to achieve quite dramatic overall things.

cabinet doors

In the whole thing but the most costly kitchen units, the carcass of the cabinets is affected from the same materials regardless of the door styles that are attached to the front. A radical update can therefore be achieved by simply replacing the doors.

Cabinet door handles

Door knobs and pulls can significantly change the look of the cabinets they sit on, and the range of choices in designs and resources on the market is almost endless. When replacing door handles, try to find new knobs or pulls that will fit directly into the existing holes in the cabinet doors to make the job quick and simple.